Showing posts with label Christmas ornaments. Show all posts

Meet the Maker: Keeley from Keeley Kreations

Hi friends! How has your week been? I can't believe it is Friday and we are heading into the weekend. Our kids are finally on the mend from this virus that they got. What is new with all of you?

Today I have the exciting opportunity to introduce you to Keeley from Keeley Kreations. Without further ado, let's meet our maker.

Where are you from? Nashville Tn but moved to Kentucky 32 years ago.

Where do you live now? In Lancaster KY living the lake life because I can't locate to the beach yet. Living the lake life sounds nice.

How long have you been crafting? Since like 5 years old. Between Sunday School and Being a Brownie.I did a lot of crafting in the groups too.

What drew you to make so many fun different crafts? The pride you get knowing you made it. We crafters have a lot of heart. Yes, crafters do have a lot of heart.


When did you start selling online? I think about 2013

And What drew you to sell online? My family. It was a hobby then they said share your hobby so I did. That's great that your family encouraged you to pursue selling online.

What hopes do you have for your business in the future? To one day retire from my day job and open a cute quaint gift shop. This is a fun dream.


What is your most favorite piece that you have made? That is a hard one because I love them all. I can understand that.

What is one thing you would love to share with others who are considering going into the handmade business? Don't let the money side of it outweigh the passion side. This is great advice.


Is there anything else you wish to share? I want to thank you, Amber, personally for this opportunity that others might get to know who Keeley is behind the name Keeley Kreation. A special thank you to all my Instagram family for their friendship and support. After all, crafting is the common thread that binds us. You are welcome. The Instagram family is a great one. I am so thankful for them as well. Great to get to know you a little better thanks for sharing Keeley.


You can find Keeley Kreations online at the following locations:
https://www.instagram.com/keeleykreation/
https://www.facebook.com/keeleykreationonetsy/
https://www.etsy.com/shop/KeeleyKreation/items

Our blog contains affiliate links. If you click and buy you can help support our blog.

Check out this fun Blog Post from the Creative Hive.
Pricing Handmade Items Guide


Day 23 of Christmas in July Craft Challenge. Only two more left to go!

Twas the twenty third day of the challenge.
And only two more to go.
Here's another guest post.
So craft and have fun.
Happy Christmas Crafting.

Christmas Tree Ornament Guest post from Eileen Wenckus.

This year during the Christmas in July Crafting Challenge I’ve been focusing on reusing old Christmas cards whenever I can.This is one of those craft ideas that works well for reusing them but you can use any pretty paper you might have available that is heavy enough, like cardstock. I was inspired by the tree I saw here: Tree Ornament and made some changes.
This craft is a little more challenging in that I used wire and did some wire wrapping which required wire cutters and pliers since it was what I had available.You may want to see what you have available that may work as a substitute
Old Christmas cards to reuse, or cardstock weight paper
Cardboard (I used a cereal box)
Templates; I used the 3.5, 4 and 5 inch templates that I made from the cereal box. There are also templates for circles online, here is one with several sizes: Circle Templates printable
Glue, I used my glue gun
Scissors: both regular and decorative edge ones (again here decorative edge scissors are not absolutely necessary).
Wire; three twelve inch and three five inch. I used something called fun wire (18 gauge) that I found in my supplies.
Wire cutters, pliers and a ruler
String, ribbon, or twine or just use a piece of yarn.

IMG_1113.jpg
Photo #1 Cut your templates out of cardboard or paper and use them to cut one of each size from old Christmas cards . Then place a dot in the middle of the wrong side of each circle and cut to the dot. Next use your decorative edge scissors to cut around the circle edge.
IMG_1114.jpgPhoto #2. Shape each circle into a cone by overlapping the cut edges leaving an opening at the top. Glue the overlapped edges in place. Repeat with the other two circles. Hold the three longest pieces of wire together and wrap the shortest piece around them to hold them in place.

IMG_1116.jpg
Photo #3 Curl up one end of each wire. Put the largest cone you’ve made on the wire and glue it in place. Wrap another piece of wire around the stem, add the next cone and glue it. Repeat the same process with the last piece of wire and third cone. Bend the top of the wires into a loop for hanging and add your ribbon.

IMG_1117.jpg
Photo #4 Here’s the finished tree. Have fun making yours.

Can't wait to see what you create. You can post a picture in the comments or in our DIY Facebook group. Don't forget to use the #christmasinjulycraftchallenge2017 and to fill out the rafflecopter below for your chance at a custom made piece of jewelry.

a Rafflecopter giveaway

Day 15 of Christmas in July Craft Challenge. Come join us.

'Tis the 15th day of creating.
What fun we are having.
With only 10 more to go!
Come one, come all.
Come join in on the crafting.

Hi, friends! How are you? What plans do you have for the weekend?
What have you been working on this week?

Today's craft comes from School Time Snippets. A Ribbon Weave Christmas Tree. Great to do with friends or the kids.

You can enter any craft into our challenge or do one of the ones that we have shared. Please share below in the comments or in our DIY Facebook group. Please use #christmasinjulycraftchallenge2017. Don't forget to enter the rafflecopter below.


a Rafflecopter giveaway

Day 9 of Christmas in July Craft Challenge!

'Tis the ninth day of creating
and all through the house,
Christmas crafts have been appearing,
But months left until we are sharing,
These treasures we are bearing!

Hello, friends. Welcome to the ninth day of our challenge. What have you been working on? Don't forget to share in the comments below or in our Facebook group. Here is a little something that I have been working on recently.


The craft for today is a fun one that you can do with kids.  Paper Straw Ornaments by Crafts by Courtney You can choose to do this craft or another one. As long as you are crafting, it counts in the giveaway. Make sure you fill out the rafflecopter below.

Have so much fun with this friends. I can't wait to see what all of you create. Happy Christmas in July. #christmasinjulycraftchallenge2017


a Rafflecopter giveaway

Day 8 of Our Christmas in July Craft Challenge

Happy weekend friends. Did you have a good week?
I am loving some of the entries we are receiving for the challenge! Keep them coming.

Thank you to Eileen Wenckus for another guest post for our challenge.

Heart of the Home Ornament

Hi I’m back again and have another fun craft for you to try. This ornament reuses your old Christmas cards. I have a lot of Christmas cards that I’ve saved and I reuse them for package tags and now for fun crafts like this cute ornament. If you don’t have old Christmas cards to reuse colorful cardstock weight paper will work just as well.

I searched especially this year for crafts that would make use of what I had on hand and Christmas cards are something of which I have plenty.
This craft is really easier than it sounds and the results are so pretty.. I was inspired to try this by several sites that I found in my search for ways to reuse Christmas cards. Here is a link to one if you need a further reference: Heart House Ornament

Let’s get started with the Heart Of the home ornament.
IMG_1102-COLLAGE.jpg
Supplies in photo #1 include Christmas cards (or other decorative cardstock weight paper), scissors, glue (I used a glue stick), two beads, some ribbon or string and a template. I drew my template freehand on cardboard from a cereal box it’s about 3 inches. If you need a template here is one which can be downloaded: Heart House Template. Use your template to cut out twelve heart houses from your Christmas cards.

Then with the wrong side up put glue on the left side of the ornament only and stick the wrong side of another piece to it as in photo #2. You’ll end up with six pairs photo #3.

IMG_1105.jpg
Now glue one side of each of the pairs together.  You’ll have three sets of four heart houses as in the photo above. Next you’ll glue those those three sets together photo #1 below.

IMG_1106-COLLAGE.jpg
Loop your cord through one bead and put both ends of the cord through the center of the ornament. Place the other bead on the cord and knot it next to the bead and then make another knot further up the cord to create a loop for hanging photo #2. Enjoy your new ornament photo #3.

Thank you Eileen.

You can post your entry in the comments below, or in our Facebook group.
Don't forget to also enter the rafflecopter for a chance to win a custom made piece of jewelry from Mt Nittany Creations.


a Rafflecopter giveaway

Day 6 of Christmas in July Craft Challenge guest post from Eileen Wenckus.

Hi friends! How has your week been? I hope you have been enjoying the challenge as much as I have been. Check out this fun first entry photo from Laura of The Dreamy Dutchy.

Today's Craft is Pop - Up Star Ornament from guest blogger Eileen Wenckus. Enjoy!

I have fun ornament for you to try. This one is not difficult it involves cutting, folding and gluing. I reused some old Christmas card, this created a mainly white star because of how I folded it. It you want something more colorful paint some paper, use paper that is printed on two sides or decorate paper with stamps. Here is a how to video where the person used stamps: Pop up ornament 

Supplies:
Five pieces of 3 x 3 inch paper and two pieces of 1.5 inch paper.
Glue (I used a glue stick)
Ribbon and a bead
A bone folder or a ruler (the bone folder is to make creases sharp but the ruler will do that to and is also for measuring your paper.

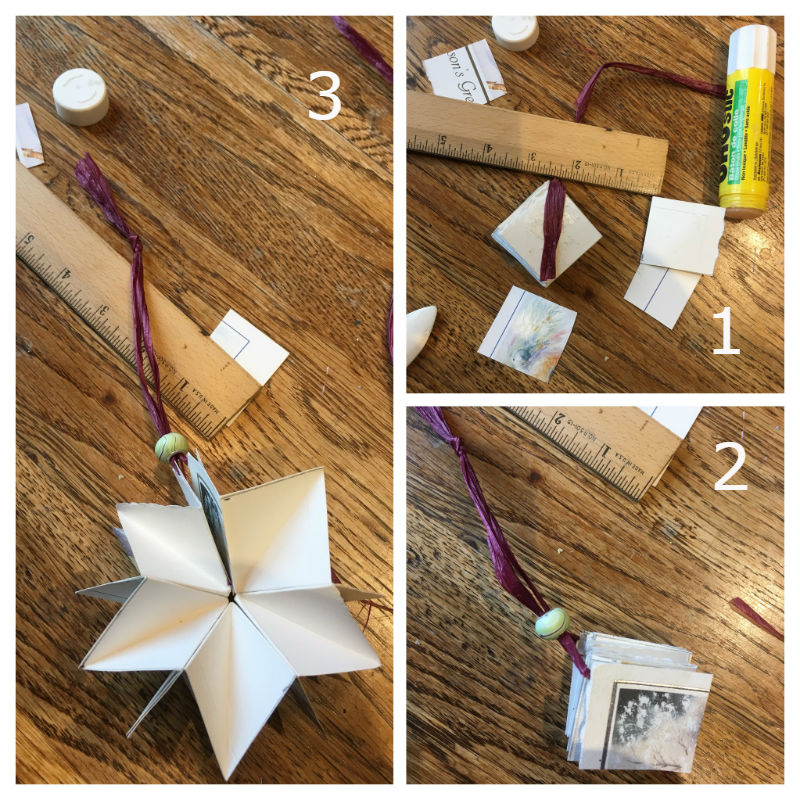
IMG_1139-COLLAGEa.jpg

Photo #1 Measure and cut out your paper you will need five 3x3 inch squares and two 1.5 x1.5 inch.  I cut mine out of old Christmas cards, I had a blank side on one side which you’ll see below I folded to a white star facing out. I could have decorated the blank side and I think I’ll try that for the next one. This one I’ll write on and use for a gift tag. Photo #2 fold each of the 3x3 papers; first fold each in half one way, then in half the other way and finally on the diagonal. Use your ruler or bone folder to give you sharp creases. You can see the creases in the paper. Next fold the diagonal crease in so your paper folds up into a triangle open at one end closed at the other. Photo #3 glue one side of each folded paper to another don’t complete the circle.

IMG_1142-COLLAGEb.jpg
Photo #1 glue a piece of ribbon to each side of the folded ornament. Then glue one of the 1.5 inch pieces to each side over the ribbon. Photo #2 put both ends of the ribbon through the bead and tie a knot at the top. This is how the ornament looks closed. I glued the decorative side of the reused Christmas card out since I wanted it in when the ornament is open. Photo #3 Pull up the bead to pop out the ornament and this is  my finished ornament - open. Enjoy making yours. I’m looking forward to seeing them.

Thanks for sharing Eileen. This looks like a fun craft.

We would love to see your entries. Please share them below in the comments or in our Facebook group.  Don't forget to fill out the rafflecopter. Each entry brings you closer to winning a custom made piece of jewelry from Mt Nittany Creations.

#christmasinjulycraftchallenge2017


a Rafflecopter giveaway

Day 2 of 25 days of Christmas in July craft challenge.

Twas the second day of the challenge,
and no one's fingers have been glued together.
So let's keep on crafting and having fun.
just you and me.

Day two's craft comes from iHeartnaptime. We are going to make Scrabble Letter Ornaments! These will make great gifts for you or your kids to make and give to families and teachers this coming Christmas.


Put your craft together and share it with us in the comments below or in our Facebook group! Make sure you also use #christmasinjulycraftchallenge2017 when posting to social media.

Don't forget to enter in the rafflecopter for your entry to win a custom piece of jewelry. Each craft counts as an extra entry.


a Rafflecopter giveaway

Advent Calendar DIy 2025 adventure!!

Hi Friends! I hope that this finds you well. I am so excited to be in another season of Advent. I am doing my DIY calendar again this year. ...